In this chapter, we’ll talk about how to set up Google Analytics, conversion tracking, and measuring analytics on your business website.
Measuring analytics is an important component of building your online business. If you’ve got solid data in place to assess how you’re doing, you’ll be able to make appropriate adjustments to your sales and marketing funnels.
Measuring analytics will give you information on things like:
- The number of visitors on your site
- How visitors you get on a daily (or monthly) basis
- Where your visitors are coming from
- The percentage of recurring visitors on your site compared to new visitors
- The pages on your site with the most (and least) number of views
- How many leads your pages are generating
And much more.
There’s a lot Google Analytics can do for you, and much of it depends on how you configure it.
In the following section, we’ll talk a little bit about how to configure Google Analytics and get the most out of it.


6.1 How to Set up Google Analytics
Before you can install Google Analytics, you’ll need to get a Google Analytics account.
If you have a primary Google Account that you use for services like Gmail, Google Drive, Google Calendar, or other Google services, then you can set up Google Analytics using that same account.
→ Click Here to Launch Your Online Business with Shopify
If you don’t have a Gmail account, you’ll have to create one.
In any case, it’s always a good idea to make sure that you create your Google Analytics account under an email address that you own – not a developer, team member, or anyone else.
Here are some basic steps on how to install Google Analytics for the first time.
Step 1: Set up your Google Analytics account
If you’ve got a Gmail set up already, you can go to navigate over to the Google Analytics page, and click the ‘sign in’ link.
You’ll be prompted to go through a three-step process to start analyzing your site’s traffic by 1) signing up for Google Analytics, 2) adding a tracking code, and 3) learning about your audience.
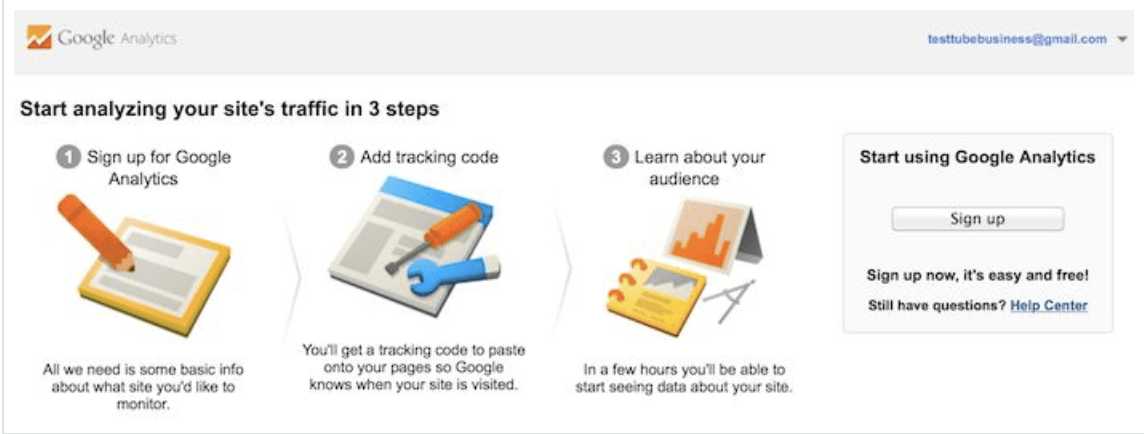
The first step is to hit the ‘sign up’ link under ‘Start using Google Analytics’ on the right. Once you hit that link, you’ll see the screen below:
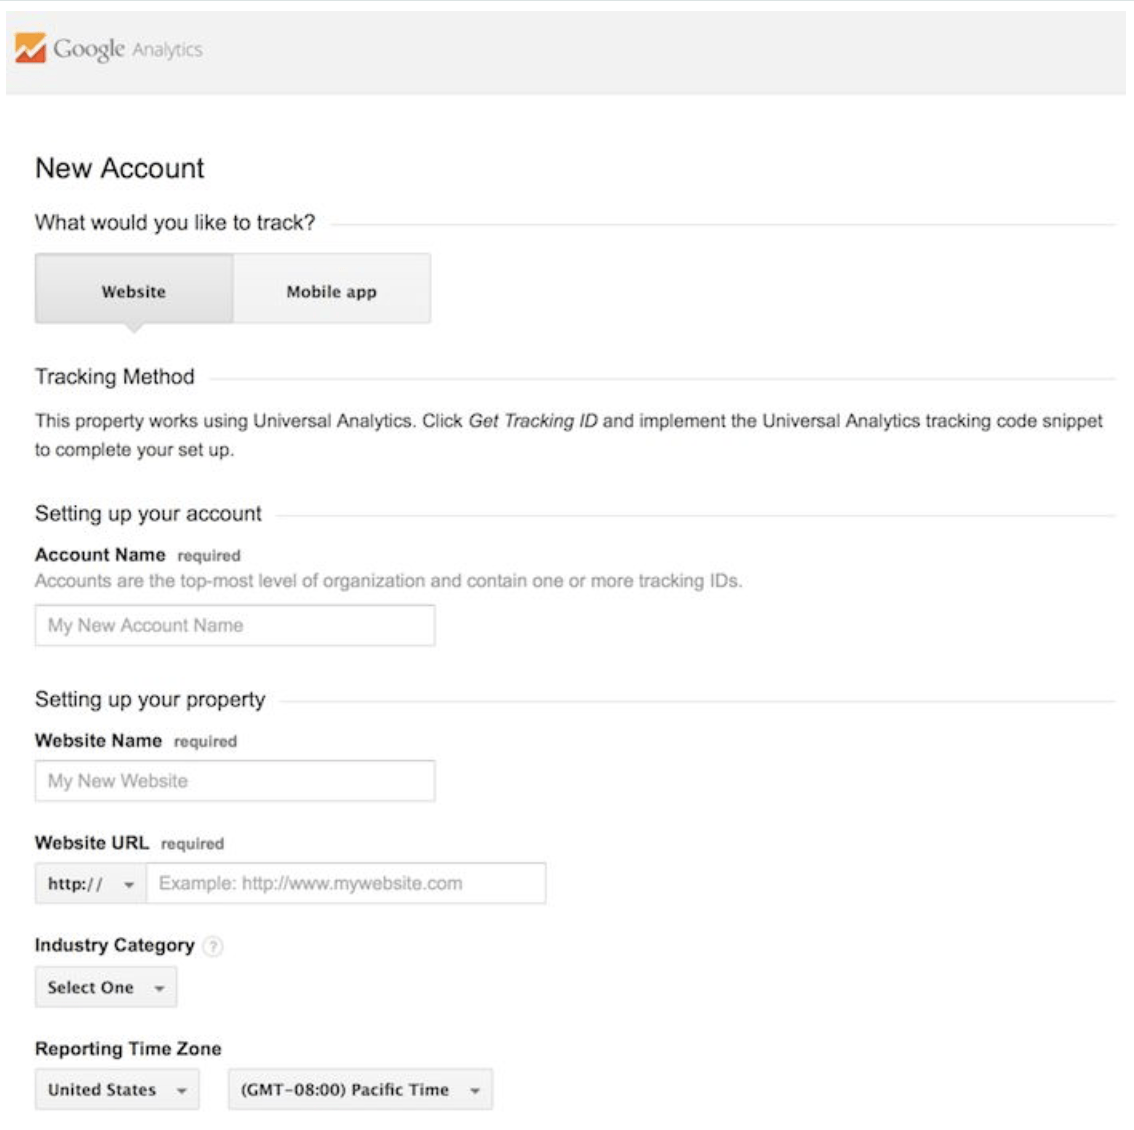
If you have a Gmail account, Google Analytics will allow you to have 100 different Google Analytics accounts within that one Gmail account. You can also include 50 different ‘properties’ in your Google Analytics account. And within each property, you’ll get up to 25 views.
You can set up your Google Analytics account in whatever way you see fit – it just depends on how you want to organize your sites.
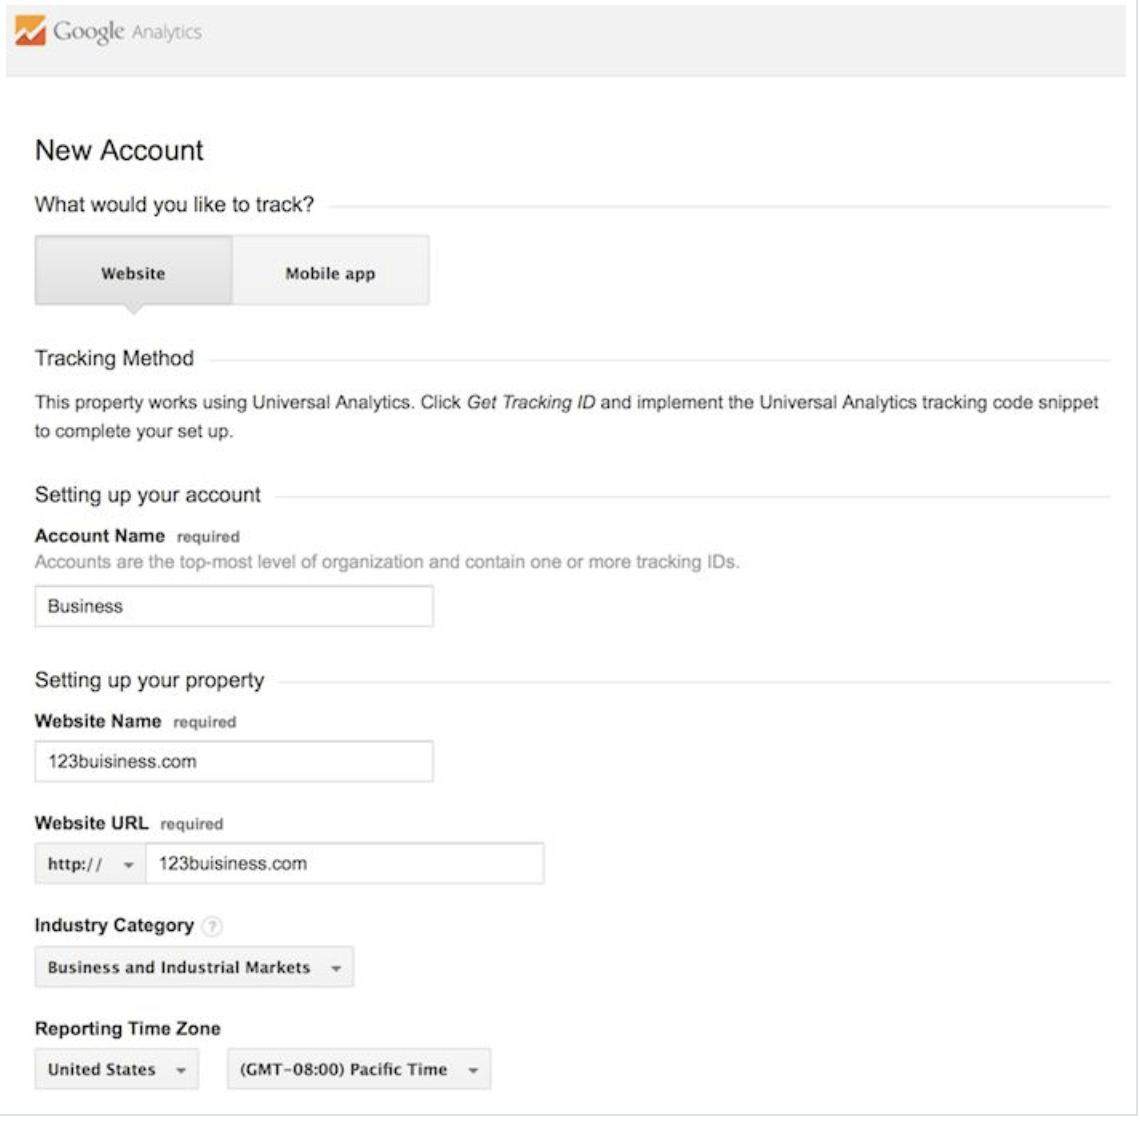
Since this is just a basic guide, we’ll give you instructions on how to set up a Google Analytics account for one site, one view, etc.The setup would look something like this.
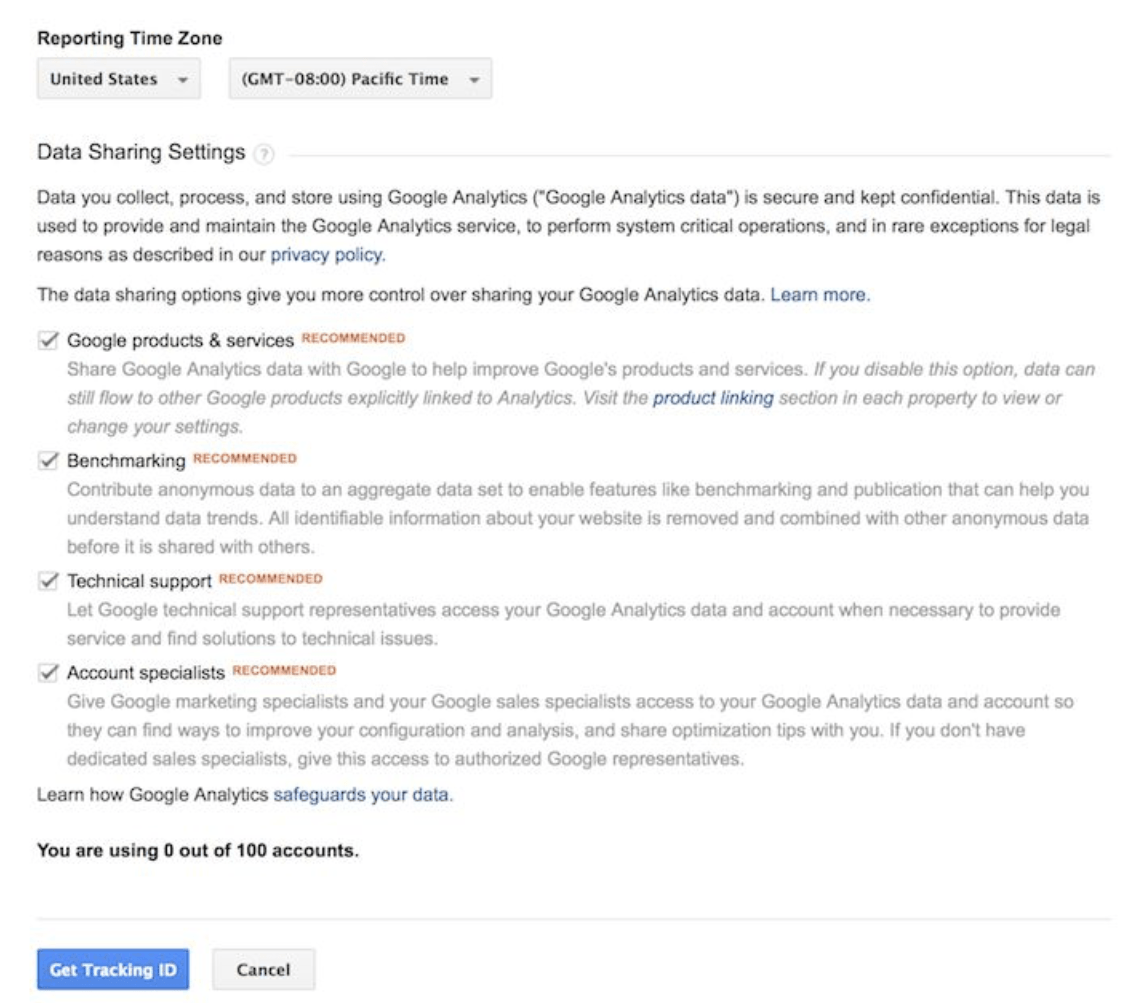
Beneath this, you will have the option to configure where your Google Analytics data can be shared.
Step 2: Install your tracking code
Once you are finished, you will click the Get Tracking ID button. You will get a popup of the Google Analytics terms and conditions, which you have to agree to. Then you will get your Google Analytics code.
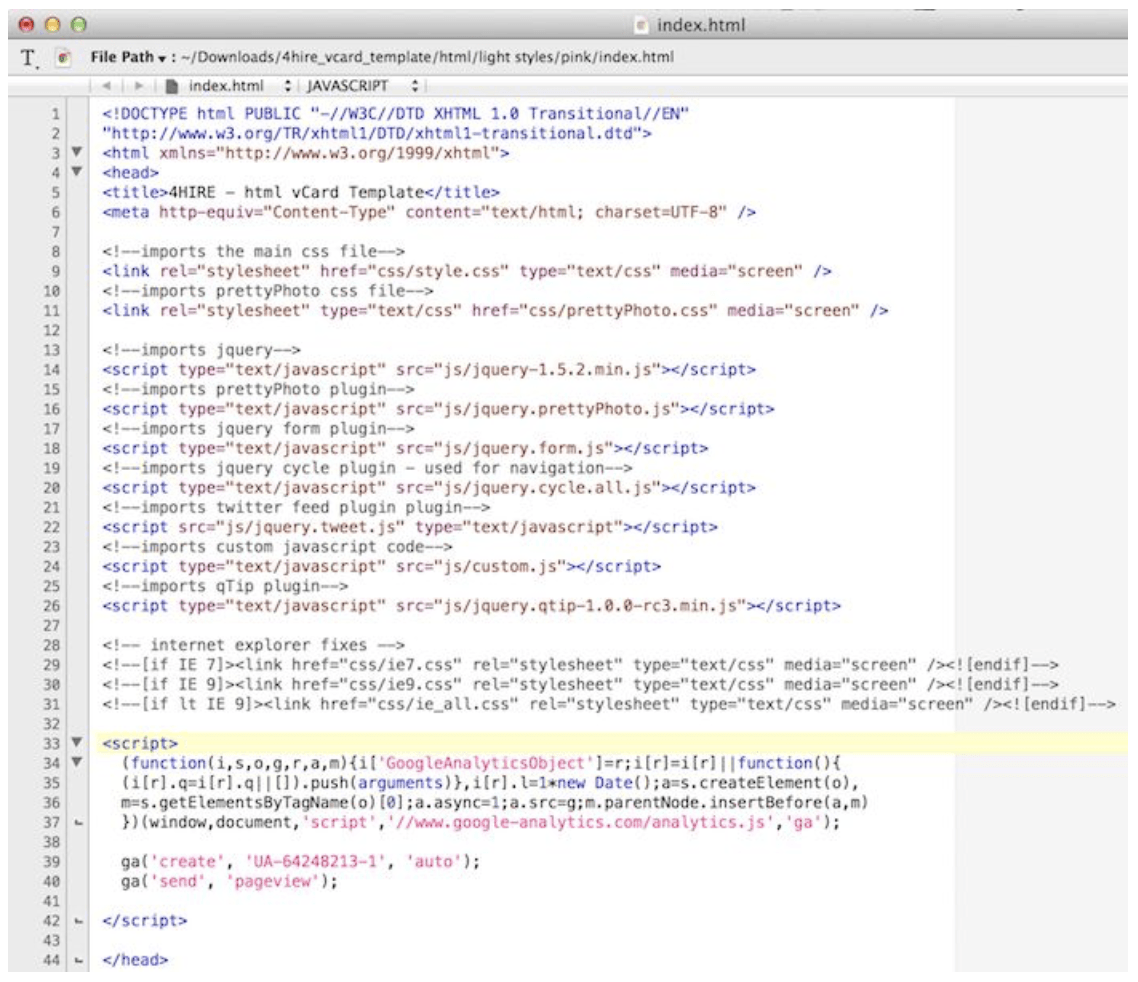
If you have a Shopify e-commerce store, you will go to your Online Store settings and paste in your tracking code where specified.
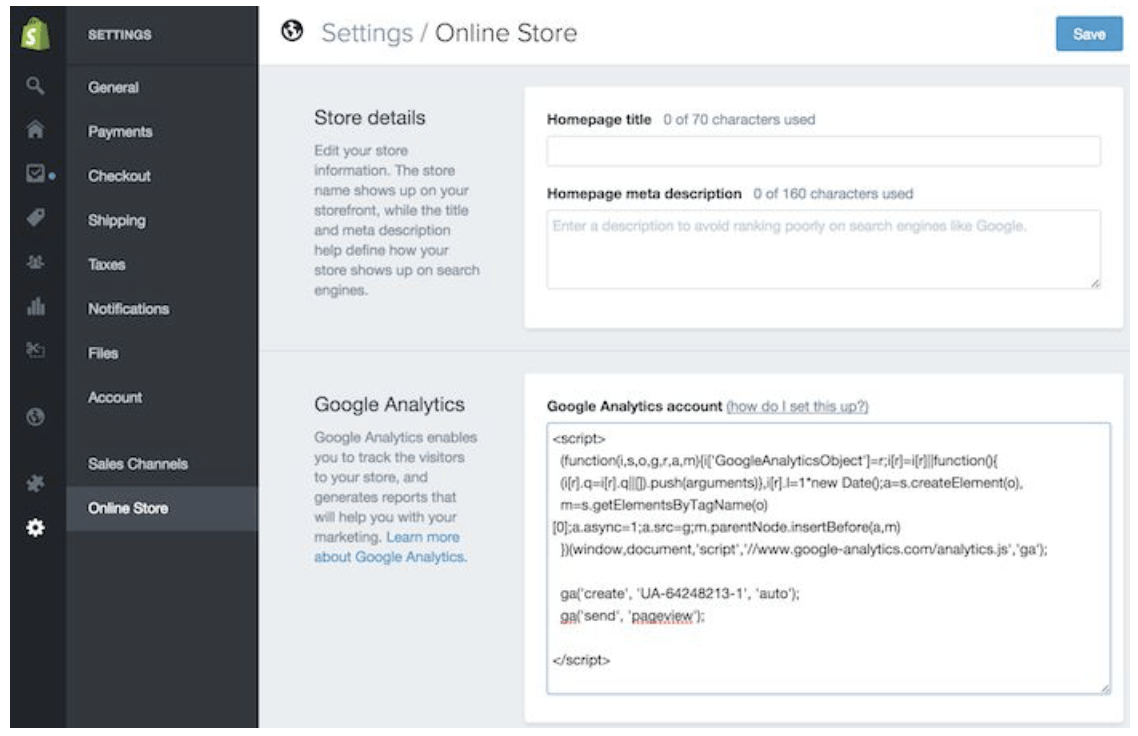
The process of installing Google Analytics depends on the platform you use – for example, the process would be different depending on the content management system you use, the website builder you use, whether you use some sort of e-commerce software, etc. But no matter what systems you’re using, you should be able to find instructions on installing and measuring analytics for the platform.
Step 3: Set up goals
After you install your tracking code on your website, you will want to configure a small (but very useful) setting in your website’s profile on Google Analytics. This is your Goals setting. You can find it by clicking on the Admin link at the top of your Google Analytics and then clicking on Goals under your website’s View column.
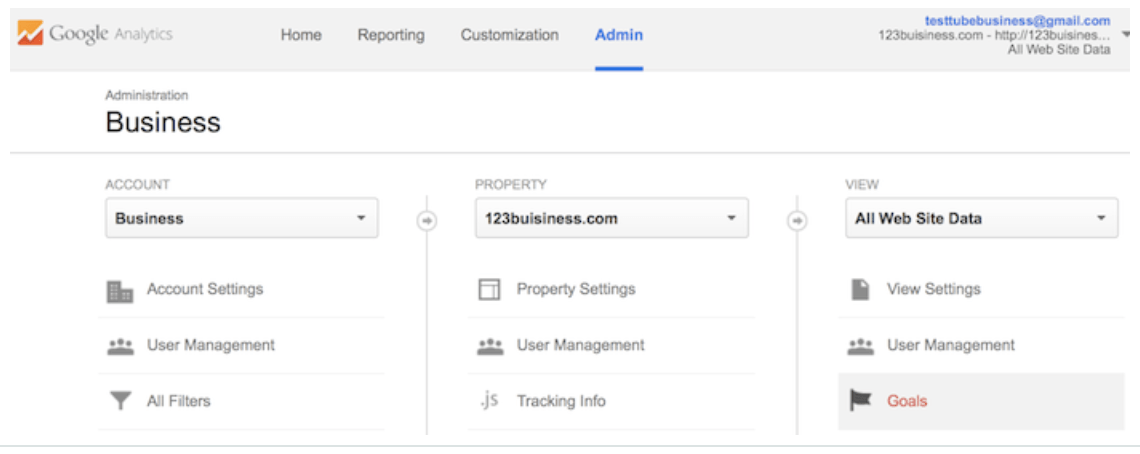
Goals will tell Google Analytics when something important has happened on your website. For example, if you have a website where you generate leads through a contact form, you will want to find (or create) a thank you page that visitors end upon once they have submitted their contact information. Or, if you have a website where you sell products, you will want to find (or create) a final thank you or confirmation page for visitors to land upon once they have completed a purchase.
That URL will likely look something like this.
- http://123business.com/thank-you
- http://123business.com/thank-you/
- http://123business.com/thank-you.html
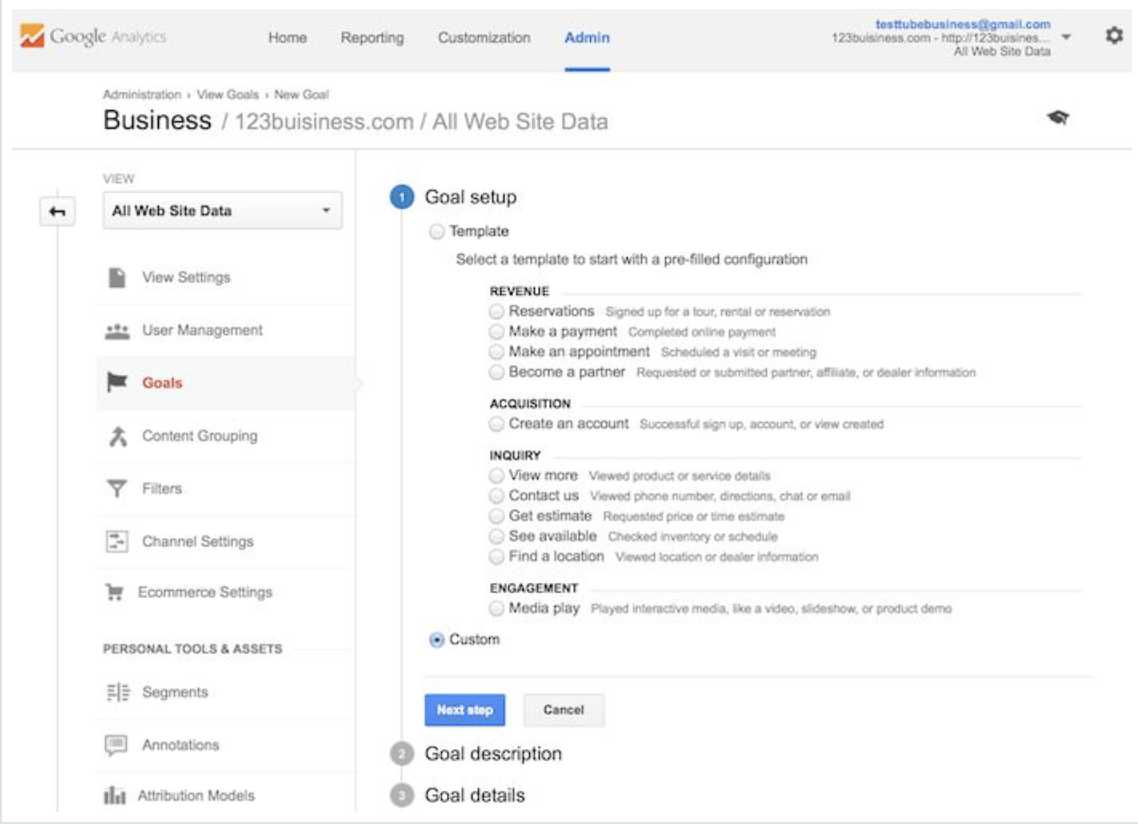
In Google Analytics, you will click on the New Goal button.
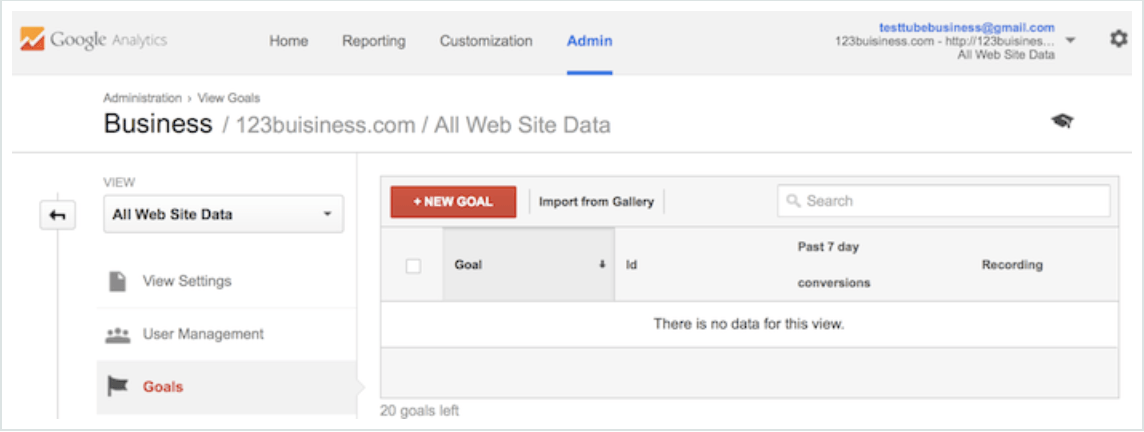
You will choose the Custom option (unless one of the other options are more applicable to your website) and click the Next Step button.
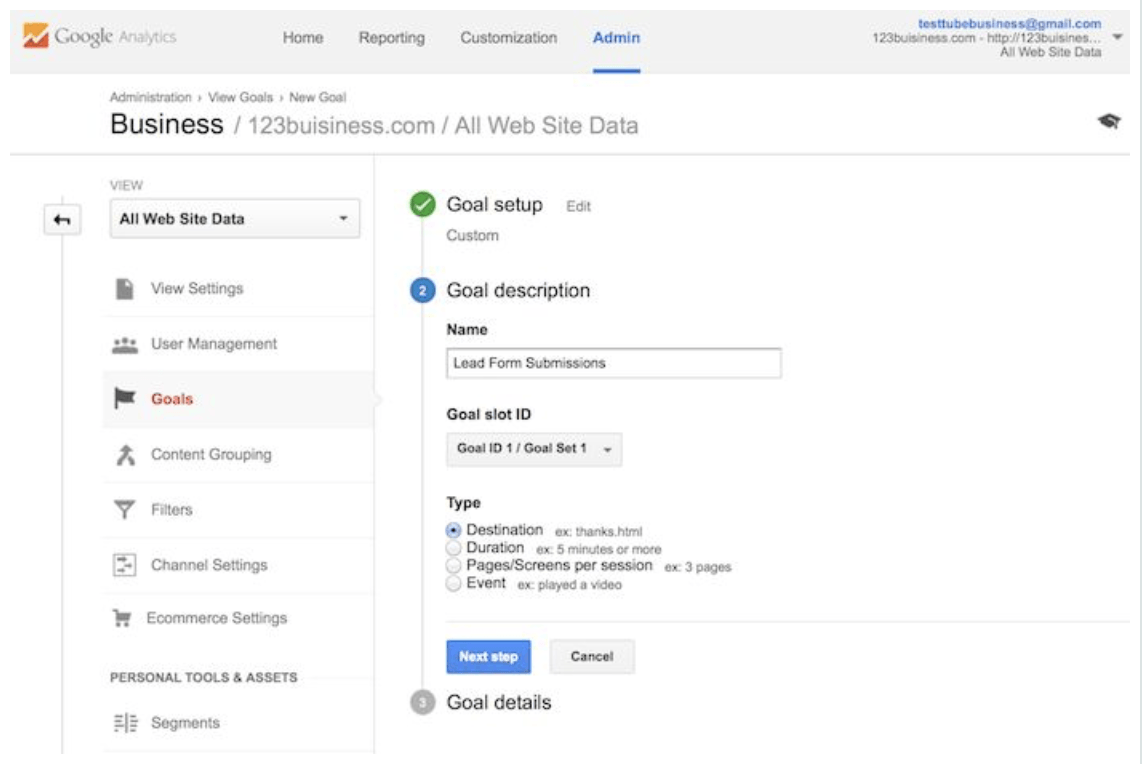
You will name your goal something you will remember, select Destination, and then click the Next Step button.
You will enter your thank-you or confirmation page’s URL after the .com of your website in the Destination field and change the drop-down to ‘Begins with’.
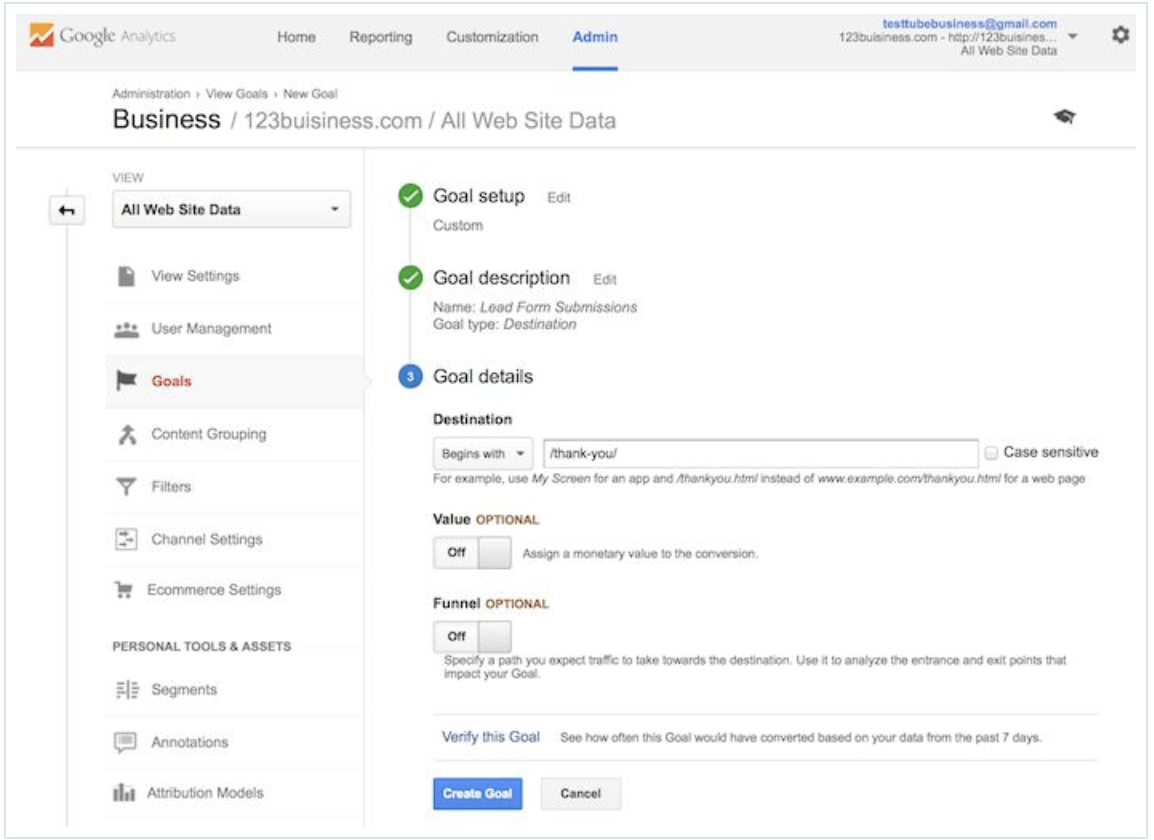
You will then toggle the value and enter a specific dollar value for that conversion (if applicable) and click Create Goal to complete the setup.
If you have other similar goals or conversions you would like to track on your website, you can follow these steps again. You can create up to 20 goals on your website. Be sure that the ones you create are highly important to your business. These goals (for most businesses) include lead form submissions, email list sign-ups, and purchase completions. Depending on your website and its purpose, your goals may vary.
Note that this is the simplest of all conversion tracking in Google Analytics. You can review the documentation in Google Analytics support to learn more about setting up goal tracking.
Step 4: View Google Analytics data
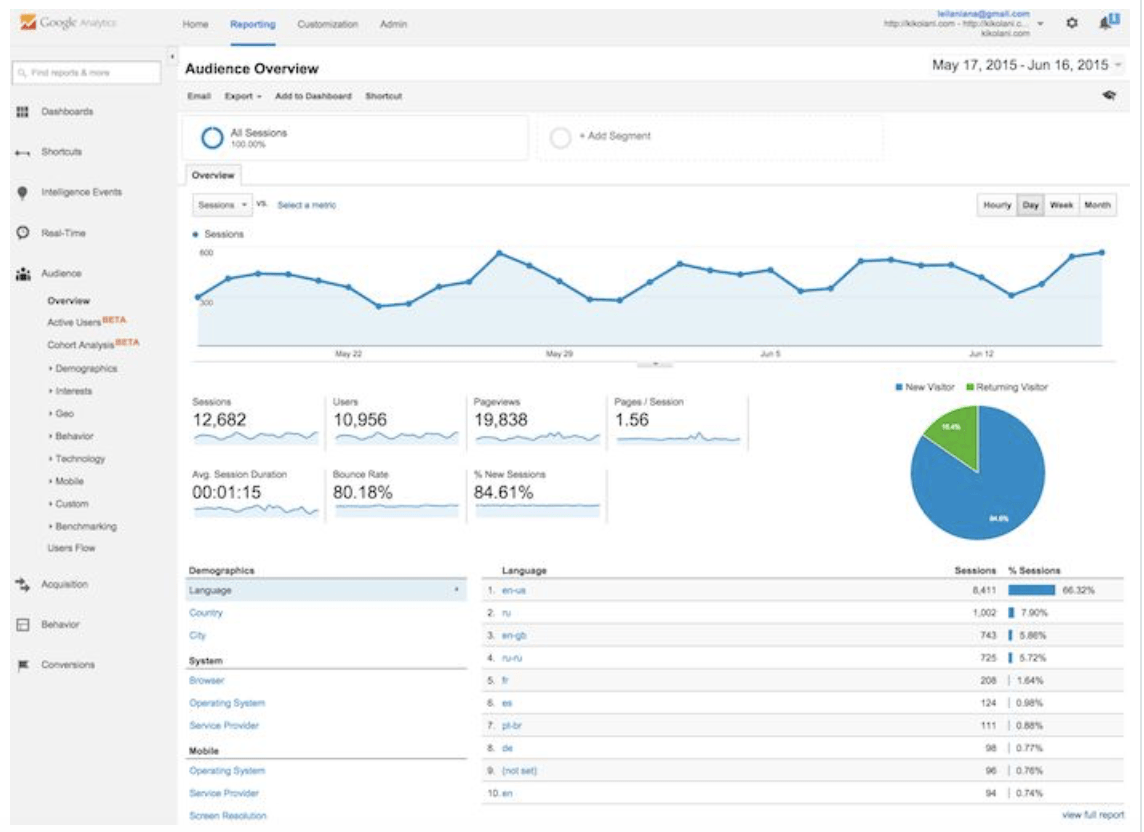
Once you start getting in Google Analytics data, you can start learning about your website traffic. Each time you log in to Google Analytics, you will be taken to your Audience Overview report. Alternatively, if you have more than one website, you will be taken to your list of websites to choose from, and then taken to the Audience Overview report for that website. This is the first of over 50 reports that are available to you in Google Analytics. You can also access these reports by clicking on the Reporting link at the top.
Step 5: Standard report features
Most of the standard reports within Google Analytics will look similar to this. At the top right, you can click on the drop-down arrow next to your website to switch to different websites within all of your Google Analytics accounts. Or you can click the Home link at the top.
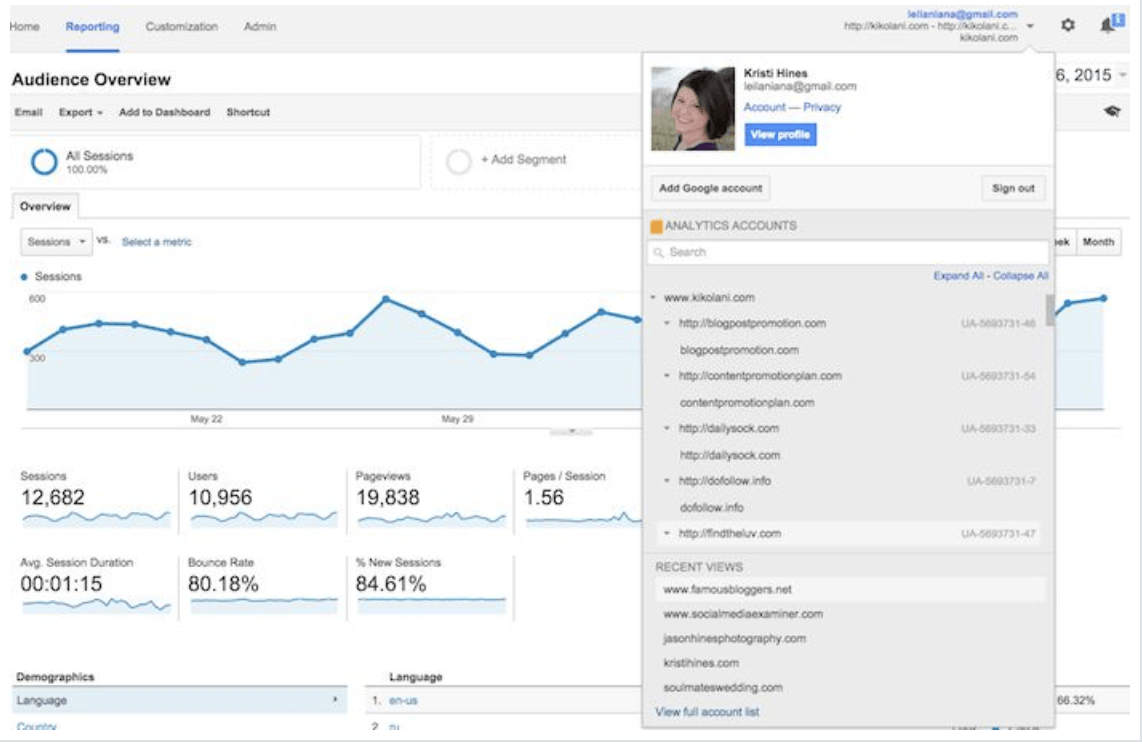
In the report at the top right, you can click on the dates to change the date range of the data you are viewing. You can also check the Compare box to compare your data from one date range (such as this month) to a previous date range (such as last month) to view your data.
You can hover over a variety of areas on your Google Analytics reports to get more information. For example, in the Audience Overview, hovering over the line on the graph will give you the number of sessions for a particular day. Hovering over the metrics beneath the graph will tell you what each one means.
Beneath the main metrics, you will see reports that you can switch through to see the top ten languages, countries, cities, browsers, operating systems, services providers, and screen resolutions of your visitors.
You can click the full report link on each to see the full reports. Or you can click on any of the top ten links to see more details. For example, clicking on the United States in Countries will take you to the full Location report, focused in on visitors from states within the US.
In this view, you can hover over each state to see the number of visitors from that state. You can scroll down to the table and hover over each column name to learn more about each metric.
You can also click on the name of each state to see visitors from cities within the state. Effectively, any time you see a clickable link or a small question mark next to something, you can click on it or hover over it to learn more. The more time you spend measuring analytics, the more interesting information you will find.
6.2 Measuring Analytics on Your Campaigns
Speaking of reports, here is quick summary of what you will find in each of the standard Google Analytics reporting sections, accessible in the left sidebar.
Everything in (parenthesis) is a specific report or set of reports within the following sections that you can refer to.
Audience reports
These reports tell you everything you want to know about your visitors. In them, you will find detailed reports for your visitors’ age and gender (Demographics), what their general interests are (Interests), where they come from (Geo > Location) and what language they speak (Geo > Language), how often they visit your website (Behavior), and the technology they use to view your website (Technology and Mobile).
Acquisition reports
These reports will tell you everything you want to know about what drove visitors to your website (All Traffic). You will see your traffic broken down by main categories (All Traffic > Channels) and specific sources (All Traffic > Source/Medium).
You can learn everything about traffic from social networks (Social). You can also connect Google Analytics to AdWords to learn more about PPC campaigns and to Google Webmaster Tools/Search Console to learn more about search traffic (Search Engine Optimization)
Behavior reports
These reports will tell you everything you want to know about your content. Particularly, the top pages on your website (Site Content > All Pages), the top entry pages on your website (Site Content > Landing Pages), and the top exit pages on your website (Site Content > Exit Pages).
If you set up Site Search, you will be able to see what terms are searched for (Site Search > Search Terms) and the pages they are searched upon (Site Search > Pages).
You can also learn how fast your website loads (Site Speed) as well as find specific suggestions from Google on how to make your website faster (Site Speed > Speed Suggestions).
Conversions
If you set up Goals within your Google Analytics, you can see how many conversions your website has received (Goals > Overview) and what URLs they happened upon (Goals > Goal URLs). You can also see the path that visitors took to complete the conversion (Goals > Reverse Goal Path).
Speaking of goals and conversions, most of the tables within Google Analytics standard reports will tie specific data to your conversions. For example, you can see the number of conversions made by visitors from California in the Audience > Geo > Location report. You can see the number of conversions made by visitors from Facebook in the Acquisitions > All Traffic > Source/Medium report. You can see the number of conversions made by visitors who landed on specific pages in the Behavior > Site Content > Landing Pages report.
6.3 Other tools for measuring analytics
While Google Analytics is a great tool for measuring analytics, there are other useful tools
1. Buffer
Buffer performs analytics on social media posts and shares. You can see what your most popular tweet or post was over time. Buffer’s free plan gives you access to information on Facebook, Twitter, Google Plus, and LinkedIn, widening the scope for your social media outreach. You can pay for more extended metrics if desired.
The Buffer-provided statistics are valuable to determine if you’re hitting your social media goals and to identify where you can improve your outreach. You can easily tell whether you are getting the most from your social networking or if you need to do more to increase your audience. It also enables you to compare your average social media post’s performance to the average current post performance to see how well it did.
2. Followerwonk
Followerwonk analyzes a Twitter account’s followers and tweets to present a range of information useful for targeted marketing. The data is broken into charts that make for a simplified graphical representation. Followerwonk also allows you to figure out most-used hashtags for an account as well as optimal times for tweeting (when most of the followers are active on Twitter).
As a tool, Followerwonk is a statistics-based treasure trove. The insight provided by Followerwonk allows you to streamline posting times and use Twitter more effectively as a marketing channel. You can even research your competitors since Followerwonk is not limited to providing data for a single Twitter account.
3. Cyfe
Cyfe has been featured in a number of magazines as a useful tool to help businesses amalgamate their metrics in one handy dashboard. It can monitor multiple websites on multiple different platforms, allowing you to draw conclusions across the board. Through the app’s separation of dashboards into intuitive groups, you can focus on one specific element of your marketing plan, such as social media or finance.
For most businesses, the free options, which limit the number of dashboards you can view, should suffice. Even the premium option ($168/year) is reasonably priced given what Cyfe offers.


Chapter 6 takeaways
- Make sure to avoid the common mistakes and errors that people make around setting up Google Analytics on their site.
- Measuring analytics can help you determine the success of your campaigns. Take a look at at audience reports, acquisition reports, behavior reports, conversions, and more.
- Apart from Google Analytics, you can use tools like Buffer, Followerwonk, and Cyfe for measuring analytics and collecting useful data.
When you’re setting up a marketing funnel or a sales funnel, Google Analytics is an indispensable tool.

